Get People to Sign Up
Would you like people to sign up to receive information from you?
I'll show you how to create a simple signup page, connect it to your own email list, and publish it online.
When someone submits the form, your autoresponder can send a verification email asking them to confirm their subscription.
You can see an example of the finished page before getting started.
You can do this with a free LeadsLeap account. I'll walk you through it, one step at a time.
What you'll have when you're done
I'll help you create a signup page where people can enter their name and email address, an email list to keep track of subscribers, and a way for people to confirm their subscriptions.
When we set up your list, you'll use an email address you can access, a valid mailing address, and a short description of what subscribers will receive.
Here's how to do it
Create your free LeadsLeap account
If you already have a LeadsLeap account, sign in and continue to Step 2.
- Open LeadsLeap.
- Create a free account, then sign in.
That link is my affiliate link. If you join through it, I may earn a commission if you later purchase a paid service, at no additional cost to you.
Create a subscriber list
- In LeadsLeap, open Email Marketing (SendSteed) → List Manager.
- Click Add a new list.
- Give the list a name that describes what people are signing up for.
In List Manager, use the blue Add a new list button. Your new list will appear with its own List ID.
Your list will have its own List ID. Write that number down. You will use it when importing your signup page.
Complete the list settings and activate it
- Click the gear icon beside your new list to open List Settings.
- Enter your name and the email address you want to use as the sender.
- Click the button to request an Email Verification Code. Open the email you receive and enter the code.
- Enter your real mailing address in the postal address field.
- Read the activation agreement. If you agree, check the box and click Save & Activate.
- Make sure the list shows Active.
The list must show a green Active status before you continue. For privacy, I have not included a screenshot containing sender information or a postal address.
Important: Don't skip sender email verification. During my own test, the form initially reported “Email not sent.” After I completed sender verification, the signup worked. I can't say for certain that this was the only cause, but it's an important check.
Start a new signup page
- Open Page Builder → Page Manager in LeadsLeap.
- Create a new page campaign and give it a name you'll recognize.
- Choose Add Design or the option to add a new page design.
- Select Import Using A Share Code.
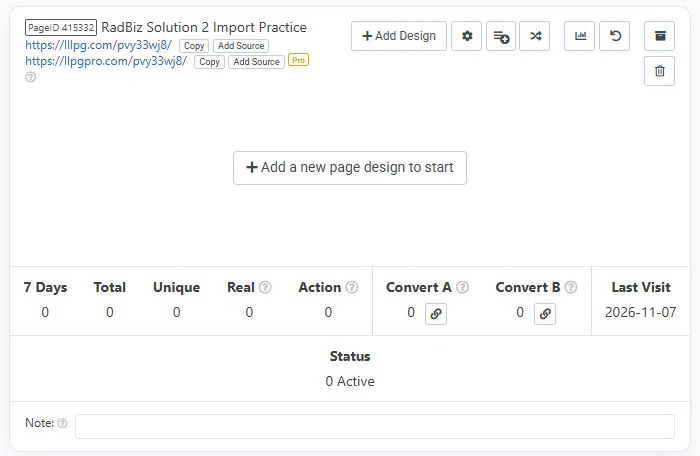
Create a campaign, then click “Add a new page design to start.”
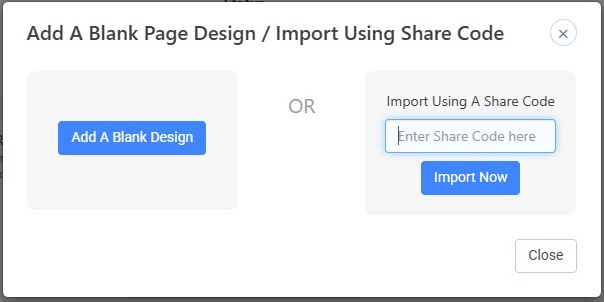
Choose the Share Code option on the right, not Add A Blank Design.
Import my ready-made signup page
Instead of building a signup form from scratch, you can use the page I already made.
- Enter this Share Code: page-atNHdh.
- Click Import Now.
- When the Share Code Replacer asks for a SendSteed List ID, enter your own List ID from Step 2. Do not leave the box blank: that keeps the example list number.
- Click Replace & Import Now.
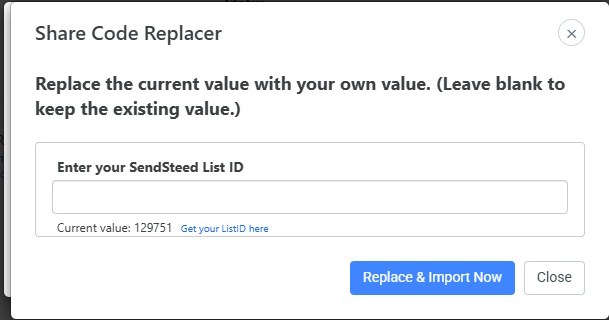
Enter your own List ID in the empty box. The current value shown below it belongs to the example and must not be used.
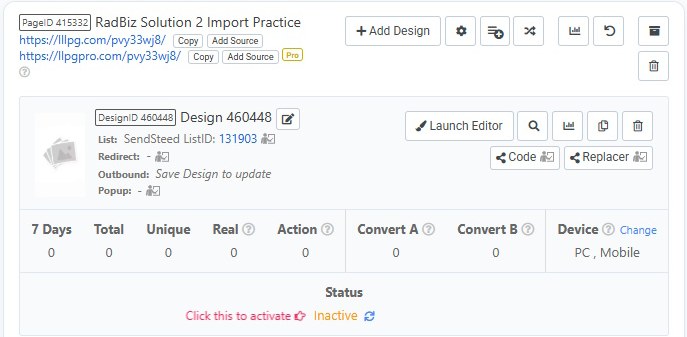
After importing, check that the design shows your List ID. In this example, the test list was 131903.
Use your own number. Don't use the List ID shown in my example screenshots. Each person's list has a different number.
Check the signup page
- Open the imported design using Launch Editor.
- Click List on the left. Make sure SendSteed is selected and the List ID is yours.
- If needed, click Get List ID, select your list, then click Done.
- Check that the page has a first-name field, an email field, and a signup button.
- Click Save.
The List section in Page Builder should show your own List ID. The imported form already contains a name field, an email field, and a button.
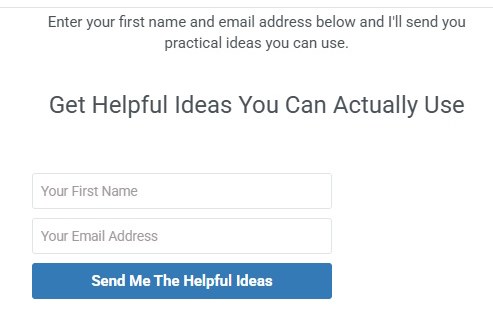
This is what the imported signup page looks like.
Publish your page and find its link
Once your page is active, LeadsLeap gives it a public web address (also called a URL). This is the link you can give other people so they can open your signup page.
- Return to Page Manager.
- If your design shows Inactive, click Click this to activate. Make sure its status changes to Active.
- Look directly beneath your campaign name for the blue page link. LeadsLeap may show both llpg.com and llpgpro.com addresses.
- Click Copy beside one of those links. This puts your page address on your computer’s clipboard.
- Open a new browser tab, click the address bar at the top, press Ctrl + V to paste the link, and press Enter.
- Make sure your signup page opens and shows the name field, email field, and signup button.
What does “share your page” mean? It simply means giving someone that copied link. They can click it to visit your signup page. For example, you might paste the link into an email or a message, or place it on your website. Use your own page link, not the one shown in my example.
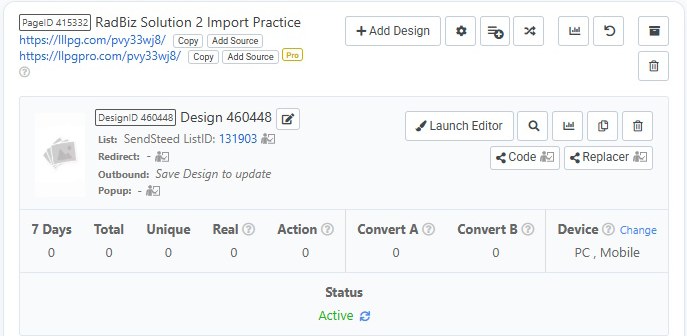
Find your blue page link beneath the campaign name. Click the nearby Copy button to copy its address.
Test one signup
- On your published page, enter your first name and an email address you can access.
- Click the signup button once.
- Look for a notice saying a verification email has been sent.
- Open that email and click its verification link.
- Look for a message confirming that your email address has been verified.
Use just one email address for your test. If you get an error, stop and check your list activation, sender verification, and form connection before trying again.
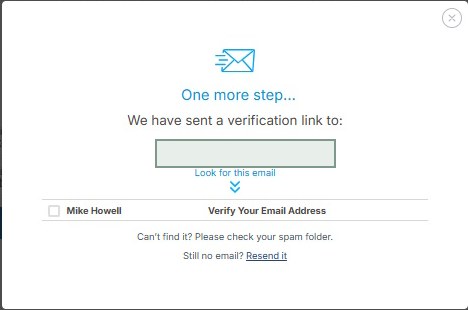
After submitting, look for the email verification notice.
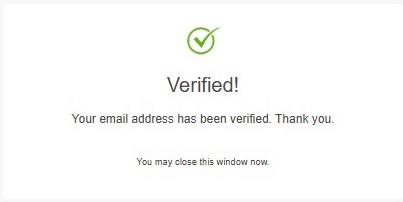
After clicking the verification link, you should see a confirmation like this.
Make sure your subscriber was recorded
- Go back to Email Marketing (SendSteed) → List Manager.
- Find your list and click its subscriber icon.
- Look for the email address you just verified.
- Check that its status shows Active.
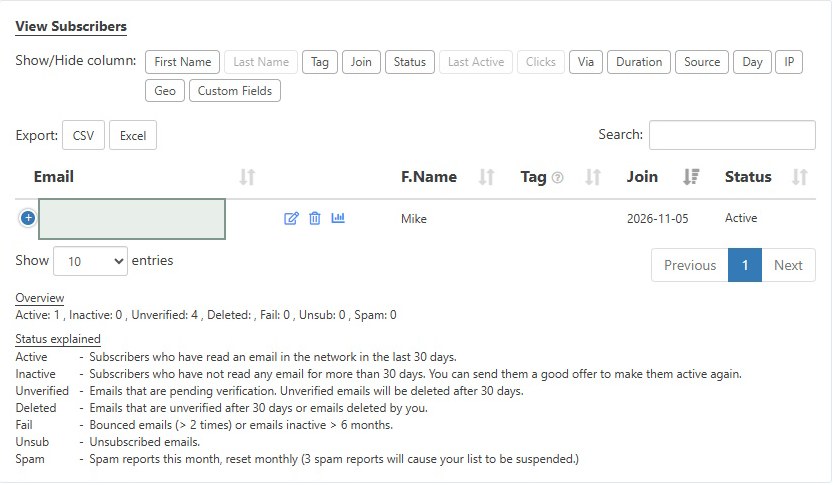
Example: a verified subscriber appears with Active status. The email address is hidden for privacy.
That's it. You now have a signup page that can collect and confirm subscribers.
Now share your signup page
Your page is ready for visitors once you have checked that the signup process works. Sharing your page means giving people its web address (URL) so they can open it and choose whether to sign up.
First, check that everything works
- My SendSteed list shows Active.
- My page is connected to my own List ID.
- My published signup page opens.
- I received and clicked the verification email.
- My test subscriber appears as Active.
Then give people your link
- Return to LeadsLeap Page Manager and find your signup page.
- Click Copy beside its blue public page address.
- Paste that address wherever you want to invite people to visit: an email, a personal message, a social media post, or a link on your website.
- Tell people what they will receive if they sign up. For example: “I share practical ideas you can use. If you’d like to receive them by email, here’s my signup page:” followed by your link.
When someone clicks your link, they will see your signup page. If they enter their information and submit the form, SendSteed can email them a verification link. Once they confirm, you can find their subscription in your SendSteed list.
Remember: Share the public page link, not the Share Code. The Share Code is used to build a copy of the page inside LeadsLeap. The public page link is what your visitors open. Make sure your page accurately describes what people are signing up to receive, and email them only what they agreed to receive. A welcome message or email series must be set up separately; importing the Share Code does not import an email series.
Want to learn more about LeadsLeap?
I've used LeadsLeap for the projects shown here and many others. If you'd like to learn more about the tools and why I use them, read my introduction to LeadsLeap →
Want one small step each day?
RadBiz 365 shares practical ideas for getting things done online.